This video is awesome at explaining a showing how to "kiss" two stamps together to add so many possibilities to your stamping projects! Check it out!
Showing posts with label Cards. Show all posts
Showing posts with label Cards. Show all posts
Tuesday, September 30, 2014

Sunday, September 28, 2014
Embossing Tools
IF you have ever thought of embossing but didn't really know how, here is a super simple how to. For you DIY-ers out there, this is a great way to kick those homemade cards up a notch!
Wednesday, September 24, 2014
Homemade Thank You Card
The new Close To My Heart annul Idea Book is out! One new item is really nice for those of us who lack time in our busy lives to be creative. Cut Above Kits have every thing you need to make homemade thank you cards as well as other cards and treat bags. This is my example of the Cut Above homemade thank you card.

Most items you need come in the kit and are precut. This thank you card kit includes the card base and envelope as well as the 3 different banners. Also, there are foam pop up squares and bakers twine. All that you need to provide is the stamps and ink. A pigment based ink is best for the black banner. I used White Daisy (z2163)

So, how much for this Cut Above Thank You Card Kit is $10.95 USD. That is just $1.10 for each card. So, if you are looking for a quick creative fix, I'd recommend making these homemade thank you cards!
Tuesday, February 11, 2014
Happy Valentine's Day with Happy Tape
So, Washi Tape or Happy Tape is becoming B.I.G. I did several Valentine's Day cards and other items with Washi. Here are some Valentines I made for my children. I also made 15 more just like these for my preschool class.
 Here is what my current stash of Happy Tape looks like.
 Here is a Valentine's day letter from my children to their grandma. Happy Tape makes this envelope pop with color.
 Here is the close-up of the back of the envelope.

Tuesday, January 28, 2014
Who's The Boss?
Well, this product isn't out yet. It will be soon. Our new Spring/Summer Idea Book goes live
on February 1st, 2014. There are a lot a new cool items.
How does Close To My Heart do it?
I don't know, but I LOVE it!
New - Embossing Folders!

Here is a sample project made with one of the folders.
There are 5 embossing folders available. Don't know what that is...
...it is clear pattered folders into which you put your paper and run it
through an embossing machine. Your paper comes
out textured and tantalizing! These folders measure 5x7 and
work with most embossing machines.
Theses cute patterns are easily repeatable for larger projects as well.
At $8.95 per folder this is an inexpensive way to add a little
something to your next project.
That's all of a sneak peek you get today!
Enjoy
*let me know if you'd like the new Spring/Summer 2014 Idea Book*
Friday, January 24, 2014
I Love Love!
I was inspired to make this simple Valentine's Day card from a card
I saw on Pinterest. What a fun and easy way to use up your scraps.
The heart is slightly folded and glues only on the fold.
This gives it a 3D type feel.
The Washi Tape makes this project feel very
hip and trendy.

On this card, I put some of the scraps on an angle to add visual interest.
I stamped "love" and added pearl embellishments.

Here is the 1st card without any embellishments.

What are you doing to tell those close to you that you love them this Valentine's Day?
Comment below.
Thursday, January 23, 2014
Celebrate With Me!

You can get an exclusive Cloud Nine cardmaking kit for $15 (retail value $46) with a qualifying purchase of $35 or more (excluding tax and shipping) during January in celebration of National Papercrafting Month. Make 10 adorable cards (2 each of 5 designs) with funky messages to put any recipient on cloud nine! You can add one cardmaking kit for every $35 in your order*.
It comes complete - 1 – My Acrylix™ Cloud Nine Stamp Set (D-size) 1 – Cloud Nine B&T Duos™ Paper 1 – Lagoon Cardstock Sheet 1 – Honey Cardstock Sheet 1 – 9" µ 9½" White Daisy Die-Cuts Sheet 1 Roll – Gold Polka-Dot Washi Tape 1 Roll – Teal Shimmer Trim 1 Package – Durables Triangle Studs† 10 – Card Bases & Envelopes 1 – Instructional Brochure Featured colors: Lagoon, Sunset, Honey, White Daisy.
What a steal of a deal.
Come celebrate National Papercrafting Month with me!
Wednesday, January 22, 2014
Monday, January 20, 2014
Valentine's Day
Valentine's Day is right around the corner.
I love to make homemade cards with the kids. They love the glue and the glitter and stickers and time with mom. This year, I have some new toy to play with. If you read my last post,
you know that I received a sewing machine for Christmas. So, on to the sewing projects.
I have yet to sew on real cloth, I just keep sewing on my paper projects.

Here I cut hearts with my Cricut. I cut many of the same size and took two and started to sew them together. When I was about 3/4 of the way around the heart, I stuffed in a tissue with scissors to really work it in there. Then I finished sewing the heart closed.
Then I added smaller hearts that were also cut on the Cricut.

Then I added embellishments.
The kids will add the sentiments.

Super easy!
I could become addicted to this sewing on paper thing.
Come visit me on Facebook
Saturday, January 18, 2014
Is That What I Think It Is?
Is that what I think it is? Yes, that is what I said when I opened this Christmas gift from my oldest son, Lincoln. Now, some of you who know me know that I DON'T sew. But, I have seen many examples on Pinterest and in the Close To My Heart Idea book of sewing on paper. Wow, it looks incredible and adds a little something more to the cards and scrapbook pages.
So, here it is. A Brother. Simple and easy for me to learn on.
Sooooo exited!

Here is the 1st project I have used the machine on.

Here is a close-up of the stitching detail. Sorry it is upside down.

I didn't want it to be perfect, I wanted to see the stitching so I made sure NOT to overlap as I went back and forth with the machine.
I would love to see your ideas and projects where you use a sewing machine to embellish.
Please find me on Facebook
Wednesday, December 4, 2013
Christmas Cards
Christmas is coming and I always love to make my own Christmas cards.
This year is no different. I used Close To My Heart products and
the design came from the Frosted Cardmaking Kit.
This design is so simple, that it could be used to make
any type of card.
I cut red and green cardstock strips along with a b/t paper strip...
These are approx. 4" long and 1.5" wide.

I glued the strips on a standard size CTMH card base.


This strip and sentiment I attached together after stamping. I wanted this to be more dynamic so I used 3D foam. This also allowed room for the twine to be wrapped around the stamped strip.

The warm wishes sentiment is stamped in Ruby. The trees are done in Cocoa (both first generation and second generation) The star snow flake in the corner is stamped in second generation Twilight ink. I attached the sentiment and then embellished with one sparkle in the star flake and three sparkles in descending size to create a more polished look.

Hope you like this! It was fun and easy to make - especially when it all comes in the
Frosted Cardmaking Kit!
Try this patter for a Thank You card or for a Thinking of You card. Cute pattern I will be using this for years to come.
Saturday, October 5, 2013
Oliver's Birthday Card
In my last blog post, I mentioned making a boys birthday card. It was designed by my 7 year old son, Oliver. He put together 2 different design elements from the Artbooking Cricut Cartridge. That's how easy it is. He picked I cut and we put it together! So here it is...
 It is a really simple card, but I think it is AWESOME for a design by a 7yr old. I added some Liquid Glass dots in sets of three for even more visual interest. Blue and orange is just a great color combination! My eyes love it.

Wednesday, August 28, 2013
Thank You Cards
I am experiencing a heat wave here in Waverly, Iowa. School started for the kids, but they have been out early every day except today. So much for starting school in August. So, today with my free time I put together some quick & cute thank you cards... Take a look!


CTMH Dream Pop paper pack has a great blend of on trend colors as
well as the cardstock with the geometric and organic sheen patterns.
LOVE IT!
If you are interested in the Dream Pop paper pack and were not able to get you hands on
it during the promotion, contact me - I have one more pack available.
with Dream Pop in the subject line!
Tuesday, August 13, 2013
Quilt Cards
I recently moved to a new city. During our "big move" the county fair started in our new town. My husband and I walked to the fair with our three children to have a look around and get a taste and feel of the town and its people. At the fair there was a pole barn hosting different crafts on each day of the fair.
It just so happened that on the day we visited, it was quilts. Oh, they were beautiful. Some were modern with crisp bold colors. Others were traditional with familiar patterns.
I was really attracted to a particular style of quilt made of rectangles of same or similar colored material cut and staggered. To add visual interest, the maker then took a dark thread and ran it through the rectangles. I love the look. Here are my interpretations of this type of quilt... enjoy!


Wednesday, August 7, 2013
Card Class

LOL Card Class
Saturday Sept. 7th 7-8:30pm
Card kit comes with all the items you'll need to create 15 beautiful cards -
5 each of three different designs.
The kit includes
- D-size (usually $17.95),
- paper,
- cardstock,
- card base and envelopes,
- 10 yards of twine,
- accent gems
- and an instruction brochure
$24.95 is the cost of the class and will cut your paper for FREE!
Monday, October 15, 2012
Christmas Cards
Most of us sent out Christmas cards, right? Well, here is a way to make your 2012
Christmas cards really special... Homemade Christmas cards!
There are 3 designs of 5 cards each - making 15 cards in all...

Card A


Card B


Card C


Don't they look amazing!
Shop here if you are want these super cute cards.
CTMH has quality product that yields
quality results.
The kit includes -
1 - My Acrylix Pear & Partridge Cardmaking Workshop Stamp Set (size c)
2 - Pear & Partridge B & T Duos Papers
4 - Cardstock Sheets (Cranberry, Colonial White, Cocoa)
15 Colonial White Cards & Envelopes
1 - Package Red Glitter Gems (108 pieces)
1 - Tan Twill Ribbon (5 yards)
1 - Instructional Brochure
Total = 29.95 + tax and shipping...
That makes each card about $2.33!
Sweeeeeet!
Monday, September 10, 2012
Avonlea Cardmaking Kit
Close to my Heart has a several new cardmaking kits.
I loved this Avonlea paper so much that I just could NOT wait to make these cute cards.

This kit comes with
- 1 Avonlea Stamp Set (size C)
- 2 B & T duo papers
- 4 Sheets of cardstock
- 15 Cards in Colonial White
- 15 Envelopes
- 1 Package of Slate Epoxy Bubbles (108 pieces)
- 5 Yards Gray Organdy ribbon
- 1 Instruction Brochure
In about 3 hours (which includes all cutting, stamping & assembling) you can make 15 amazingly cute cards! That's 5 each of the 3 designs.

Card A

Card B

Card C
So if you'd like to make these cards with me, or even if you just want to order the kit and make these cute cards yourself -
COME SHOP WITH ME!

Wednesday, May 23, 2012
Teacher Gifts - Sweet Surprises!
My Originals Sweet Surprises Card Kit

This is a complete card kit which includes...
10 Tri-fold cards
10 Envelope boxes
10 Treat cups
2 Sheets of stickers
1 Sheet of Dimensional elements
2 Yards of ribbon
10 Dimensional sentiments

So, you pick which candy you want to put in the cup... I chose Runts
because I loved their color and the size was perfect! I completed the inside of the card first, added embelishments and had my daughter sign this for her pre-school teacher.

This is the completed inside

I put a dimentional cupcake on the outside to match the inside with a dimensional sentiment. This one says "Wishing You" and I wrote "a sweet summer" on the inside. I also added some of the stickers that came in the pack and closed it with the ribbon (also included).

Here are 4 of the 10 finished product...I know the teachers will get a kick out of these unique cards!
Tuesday, May 15, 2012
Frilly Dress Card
I was going to make these cards for Mother's Day, but I lost all track of time. So, I made them today! They turned out great! I going to share with you step by step how to make these yourself. I started with B&T paper (background & texture paper) that has a different pattern on each side - the name of this paper pack is LUCY. I cut out 2 skirts - 3/4 of an inch and the top and 4 1/4 inches at the bottom...


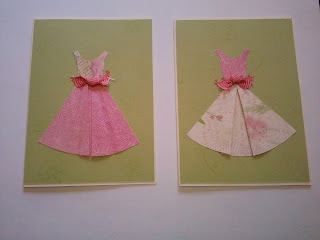


I then scored each skirt and folded as desired.

I then cut 2 tops out of the same paper and put them with the opposite skirt.

If the skirt and top of the dress differ a little in size, don't worry, most of the middle area will be covered by the belt. (see below)... to make the belt, take a coordinating ribbon and make small tight knots and cut close to the knot.

I then attached the skirt, top and belt to a complementary color card stock after random stamping the card stock.Then I attached the card stock to my actual card base...
Easy as that!
A frilly dress card!


Subscribe to:
Posts (Atom)